Bridge Comparison Blog-G8 Ziyang Pan

So i had to keep adding material to make it strong enough, it took a while for me to successfully run it, but this happened:

I went back to the PDF and carefully looked at the Truss Bridge section, and noticed that repetitive triangular framework is what’s needed that allows the structure to handle weight and pressure incredibly well. So I made a new project and started over by choosing the Truss Bridge template for a reference, and by just connecting the dots with lines and thickening some compressed lines, and finally after lots of runs, it worked!

But when I saw my peer’s work i thought mine was nothing some of theirs are already under 200K, which is where i can’t even reach even at the end of this project I’ve got a cheap bridge of 295,580.31USD. Before that I kept working from almost a price of 500K to under 300K. During that time i had found that Truss bridges use a clever balance of tension and compression forces—making them strong, stable, and ideal for supporting heavy loads across long spans.

When I was just wondering why my lines are not capable of compression parts, I heard Tr.Robert talking about compression VS tension relates to hollow tubes VS solid bars. So I looked into the PDF again and I learned- “Truss bridges use a clever balance of tension and compression forces—making them strong, stable, and ideal for supporting heavy loads across long spans.” So I changed a lot of my lines to hollow tubes from the compression/ tension forces chart.

And this is before adding hollow tubes:

And this is after adding hollow tubes:

As you can see:

Hollow tubes are great under compression. Since compression tries to squish the material, a hollow tube can resist buckling better because of its shape—it spreads the force around the outside. They’re also lighter and cheaper, which helps reduce the overall cost.

Solid bars, on the other hand, are better for tension. Tension tries to pull the material apart, and a solid bar gives you more strength across the entire piece. Since the material is consistent all the way through, it’s less likely to snap or stretch too much under pressure.

This transformation from an all solid bar truss bridge to a mixed(solid bar and hollow tubes) truss bridge had made my bridge way cheaper price before adding is 311,556.97USD, while the price after adding is 295,508.31USD.

One interesting fact I found when i was walking around is that people are struggling on their bridge design because of the bridge type they chose so I went back to my seat and checked out the PDF again. What I’ve noticed is that unlike beam or arch bridges, truss bridges rely on triangular units to distribute weight efficiently. This structure makes them strong, lightweight, and perfect for longer spans without needing tons of material. So I think I was really lucky that I chosen Truss Bridge.

“What makes truss bridges special is how they balance forces—the triangles spread out the tension and compression so no one part of the bridge takes all the stress. This lets the bridge stay strong while using less material than other types.” according to the PDF, I’ve noticed that triangles are a really good shape for an inside support of a bridge, which gives me inspiration me to continue working on my Truss Bridge design.

final bridge design picture:

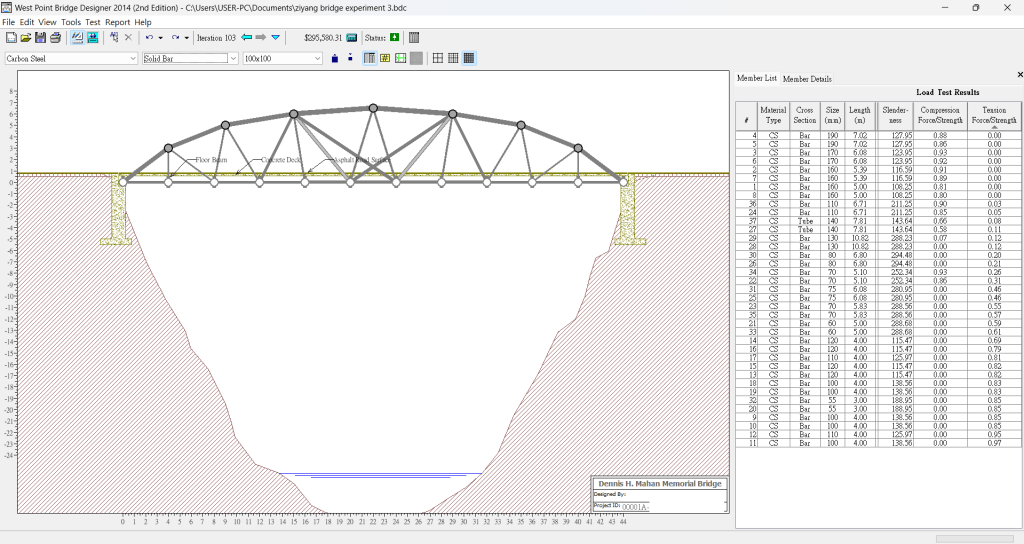
The price of my bridge design:

Throughout the project I’ve learned many facts about Truss Bridges, such as “the power of triangle” and “Tension Vs Compression, Solid Bars VS Hollow Tubes”, this experience might not have only been a computer science lesson but also an engineering and physics lesson.

Honestly, this project was way more interesting than I expected. It wasn’t just about building some random bridge—it was about figuring out how physics works, where I messed up, and how to fix it. Infinite trials and errors. I liked seeing how small changes made a big difference, especially when it came to cost and strength. It kind of made me realize how much thought goes into things we see every day but never really think about. Overall, it was actually a fun way to learn about engineering.

8. Bridge Designer Versions:

I can’t find a website where I can install the Bridge Designer 2014 Software, but I do and did download the Bridge Designer 2016 Software, so I couldn’t open the previous (cheapest one) I’ve made in school, which is very tragic for me because I worked so hard on that one.

DID YOU KNOw video

    This video’s primary focus is about how people are relyinging on AI or other technology, and it also focuses on how robots take over people’s jobs and facts that are going to or happening around the world. It also talks about very interesting and provoking facts about the future. I was very surprised that 25% of the population in China with the highest IQ’s is greater than the total population of North America, and due to the current situation, the intelligent population of China might have more opportunity to get jobs than people from North America. Also 181 zettabytes of unique new data will be created worldwide in 2025, which means in just less than one year, this much new information may become available to any jobs that need it.

    This video made me feel like the whole world is changing in so many ways, and I learned a lot from this video. I always thought robots are cool and are not harmful to humans, but now according to the video, robots are actually taking over humans’ jobs, and if this keeps happening, then the unemployment rate will increase, causing people to get poorer.I feel like I should be looking forward to jobs that still exist in the future, like e-sport athlete.

    I think the video has well-conveyed its message, but it also has some biases like it barely talks about how jobs are taken over by robots, and the unemployment rate increases due to robot making or using jobs that are in very high demand and causing businesses to collapse.

    The video is very important because it also talks about current events like how China and India have become the most populated country in the world and this made me think that the ones we are going to compete with are these people, and these two countries are very smart.

    After All this video is very useful and it contains lots of interesting facts that you can conceive. I think highschoolers should watch this video because they are at a stage where they have to figure out what they want their job to be, and if they watch it they can maybe have a better idea about their future jobs. Of course other people can watch it too, if you want to know about some interesting events going on around the world.

Final Alice 3 Project By Ziyang Pan

“The Boy in the Striped Pyjamas” Chapter 19

This scene is the most emotional and climax of the novel, with two main characters confessing to each other. Bruno, a son of a Nazi commandant; Shmuel, a Jewish kid imprisoned at Out With concentration camp.

Scene Summary

In this scene from “The Boy in the Striped Pajamas”, Bruno sneaks under the fence to help Shmuel search for his missing father inside the concentration camp. They walk holding hands through the camp, unaware of the danger ahead. It is one of the most emotional moments in the story, showing how their friendship crosses boundaries.

Personal Reflection

This project helped me understand the coding and three other things

Joint manipulation

Do together command

Camera and movement coordination

At the same time this project also gave me a chance to enhance my storyboarding skills, animation timing, and how to translate a dramatic scene into a digital world. Recreating the moment from code made me think carefully of the dialogue.

Alice 3 Procedures, Synchronized Dance

What I’ve learned

In this project, I created a synchronized dance using a few biped characters in Alice 3. I used the animation tools to move their joints (like shoulders, ankles, neck, and pelvis) to perform a choreographed dance routine together. The focus was on using OOP (object oriented program), especially procedure and inheritance.

Reflection

This project helped me understand how inheritance saves time and keeps animations consistent, and how procedures make large programs easier to manage. I also had fun timing the moves of the characters and customizing the joint animations to match.

Alice 3 Moving, Resizing, Changing Color, And Changing Transparency & Moving Individual Body Parts

On my previous blog: https://ibstziyangp.edublogs.org/2025/05/12/alice-3-tutorial-1-blog-post/?authuser=1 ,I have introduced what the Alice 3 Program is and it’s inspiration for me to make a second project which will be what’s on this blog.

But before showing my project, I want to talk about what I’ve learned throughout and even before I started the project. Mr. Robert let us watch two tutorials this time, let’s start with the first one.

First Tutorial


This tutorial focuses on animating specific parts of a character’s body

Selecting Body Parts: Choosing individual limbs or components of a character.

Animating Movements: Applying movements like bending an arm or turning the head.

By learning to control individual body parts, you can create more realistic and expressive character animations, which is in my project

As you can see, the characters have both shifted position, rotation, and now even the directions of the rolled or turned limbs!!!

By the way, that gate is a object from prop class, unlike the rest of the class these class normally has big objects, but they’re static throughout the whole event, means they don’t move at all.

In this picture i made the pelvis roll forward worked together when the whole body turns forward 0.25 so that it looks like his legs are on the floor.

Second Tutorial

In this tutorial, you learn how to manipulate objects in Alice 3 by:

Moving Objects: Positioning objects within the 3D scene.(x,y,z)

Resizing: Adjusting the size of objects to fit your scene more satisfying.

Changing Color: Modifying object colors to enhance visual appeal.(there is a funny adjustment you can make by changing the baby’s diaper to yellow 🙂 )

Adjusting Transparency: Setting the opacity levels of objects to create effects like ghost or disappear.

I’ve done a funny resize on my project where the baby grows really big

Its legs grow extremely long bigger than the monster, just when i put his resizing factor at 10 it went that big, so i might need to add more adjustments.

And don’t forget, the monster in this picture has all limbs back to place, that’s because I put:

Challenges

It is really hard to make a kick naturally because I will have to keep straightening the body throughout the process

Finalized project

Scene Setup:

Code Editor:

Summary

I think Alice 3 is a really good program that gives me a chance to explore and learn programming or coding in a fun and entertaining way. If I were given more time for this project I would focus on the body/joints movement and the camera perspective adjustments.

Alice 3 Tutorial 1 & Blog Post

https://www.youtube.com/watch?v=q9Wtu2iSKpo
That was the tutorial video we’ve watched altogether in class, though I heard some complaints behind me when we’re discussing about this Alice Program, but me personally think this program is a free tool that helps us learn some basics of coding by

In the first tutorial, I created a short animation where a little brown bear and a blue Alice greet each other. Here are three things I learned:

  1. Setting Up the Scene: I learned how to start a new project by choosing a template and adding objects by finding them in classes then subclasses then to an individual to the scene. This step is important before making any animations.
  2. Using the Code Editor: The tutorial introduced me to the Code Editor, where I can drag and drop instructions to program objects’ movements. I learned how to change position and size and rotation of the objects.
  3. Controlling the Camera: I discovered how to move and adjust the camera to view the scene from different angles. This skill is essential for setting up the right perspective in animations and making sure that the audience sees what was wanted to be shown.

Scene setup:

Code Editor:

Final Output:

Summary

This tutorial taught me lots of skills to give me to chance to continue animating and programming funny stories, thanks to Mr. Robert for introducing this amazing and free program, I’ve found lots of different ways to make the same output which is very fascinating. I will continue programming on Alice 3 with the new things that I’ve learned.

MASTERING GOOGLE SEARCH VIDEO

    This video wants to tell us about how the internet search engine works and how it gives us advertisements based on our searches. It says that the search engine uses my question to find links and to see the links inside and after all the data is collected it starts asking questions like: does this match my topic?, or it will look for keywords in my question.

    It says that based on our searches, Google can give us some advertisements that only show what we want to know. I don’t think it is true because it always gives me unnecessary ads that I am not interested in, like grammarly or other writing AI websites. It also mentioned that the search engines do not get paid for putting websites on the first one on the list, but to me it is not true.On my social study essay I even have to go to the third page of the search  list to find the accurate information that I wanted.

    It did not influence me as much as the previous video because it did not provide enough evidence and example, but the part about how the search engine find accurate data is very good, it is very interesting because it finds millions of results and even after asking different types of questions to filter the list, it still has thousands of websites. Now that I know how the search engine works, maybe I can find a faster way to get the accurate information that I wanted.

    I think this video is not as well-conveyed as the previous one because it kind of lacks evidence, and I think if they put more examples on the video, then it could be more interesting and reliable.

    This video helps me in my future career in a lot of ways, it not just says how the search engine works, it also motivates me to find or create faster ways to find the information that I want. If I am a Chatgpt developer and I have to find data online then I would have to find a faster way to get my result.

    I would recommend the video to people that are interested in how search engines work like Google or Twitter etc. Even though the video has some unreliable statements on the advertisement part, they describe the process of the search engine where we type in a question and how they eliminate websites by different ways and how we get our final result.

Shortcut keys

CTRL+S= save changes to a file or document 

CTRL+P=Print

CTRL+Z=Undo what you just did

CTRL+C=Copy selected words

CTRL+V=paste what you copied

CTRL+X=Used to select text

CTRL+B=When using internet browsers it shows your bookmark. When using a powerpoint or spreadsheet programs it boldens your selected text.

CTRL+U=When using microsoft spreadsheet program it underlines or delete the underline from your selected text.

CTRL+I=Often used on microsoft spreadsheet programs to italicize the selected text.

CTRL+ =Often used to zoom in.

CTRL – =Often used to zoom out.